Tip: If the L-shaped job has been generated previously for the buildstyle under calibration, click Skip Step.
Printer Calibration
Description
Calibration is a crucial step in the 3D printing process. It involves calculating the compensation coefficient for material shrinkage and saving it in the buildstyle file. By calibrating your 3D printer, you can compensate for the natural shrinkage of the material used for printing.
Important: Each material is supplied with a default buildstyle. Use the default buildstyle to calibrate your printer for the new material.
Note: If you use different materials on your printer, it's important to calibrate your printer for each material. This involves calculating the shrinkage compensation coefficient for each material and saving it in the corresponding buildstyle. Similarly, if you have multiple printers, it's crucial to calibrate each printer separately and save the shrinkage compensation coefficient in the corresponding buildstyle for each printer.
Note:
Procedure
1. Navigate to ![]() > Calibrate Printer.
> Calibrate Printer.
→ The system shows ‘Step 1’ of Shrinkage Compensation calibration with the name of the selected buildstyle.
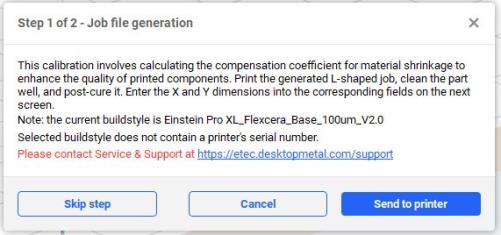
2. Press Send to Printer.
Note: If the selected printer is Virtual or offline, you cannot send the L-shaped calibration job to the printer, you can save it and transfer it to the printer via USB drive.
→ The L-shaped job is generated and sent to the printer.
→ The following dialog box appears.
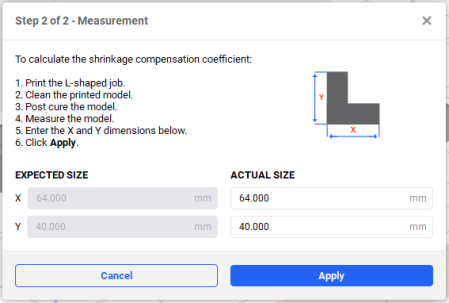
3. Print the L-shaped calibration job on the printer and clean it well.
4. Post-cure the printed part as required for the material.
5. Measure the model as shown in the picture in the dialog box above, see Tolerance List.
6. Enter the X and Y dimensions in the Actual Size input fields.
7. Press Apply.
→ The shrinkage calibration coefficient is saved in the buildstyle.
Note: If the X and Y dimensions in the Actual Size input fields are not within the L-shaped Model Dimensions Range shown in the Tolerance List below, then you must repeat Steps 1 - 7.
Tolerance List
| Printer | Tolerance, um | L-shaped Model Dimensions Range, mm |
| Einstein™ | 101 |
X: between 63.90 and 64.10 Y: between 39.90 and 40.10 |
| Einstein Pro XL™ | 92 |
X: Between 63.91 and 64.09 Y: Between 39.91 and 40.09 |